
The Smart Marketing Guide to MailChimp for Email Marketing

If you’re thinking about email marketing for your small business you may be wondering if MailChimp is a good option for your business and how to get started.
In this article, I’ll for over what MailChimp is, who MailChimp is for, what business owners think about MailChimp and if it’s a good option for your email marketing.
I’ll also dive into MailChimp’s features, how to get started with MailChimp including how to import your contacts and create your first email and talk “classic” vs the “new” builder.
Let’s get started!
Why do businesses use email marketing?
Email marketing is a great way to reach out to your customers and potential customers by sending them newsletters, updates, or other information that may be of interest to them.
By having an email list, you can stay in touch with people who have already shown an interest in what you do, and it’s a great way to build relationships with potential customers.
To do effective email marketing, you need an email marketing platform. There are many out there, but a good one to start with is MailChimp.
What is MailChimp?
MailChimp is an email marketing service that makes it easy to create beautiful, professional-looking emails. You can create custom templates, add your own branding, and send out automated or one-time campaigns. Plus, MailChimp integrates with popular small business tools like Shopify, WordPress, and SquareSpace.
Why is MailChimp good for email marketing?
There are lots of reasons! MailChimp is easy to use, it has a ton of features (like automation and custom templates), and it’s free for up to 2,000 subscribers. Plus, MailChimp integrates with popular small business tools like Shopify, WordPress, and SquareSpace.
What do people think of MailChimp?
According to GetApp 92% of reviews think positively about MailChimp.

We’ve used MailChimp for years for our beginner email marketing clients, and other than some funky plans and billing, we have no complaints. More on that later. It’s easy to use and easy to create really professional-looking beautiful emails.
Who is MailChimp for?
MailChimp is perfect for small businesses that want to start email marketing campaigns. As mentioned, it’s easy to use and has a lot of features that make it perfect for beginners and experienced email marketers.
MailChimp’s best mail marketing features
MailChimp is one of the most well-known email marketing platforms. It’s good for email marketing because of how simple and well laid out it is and has a lot of features that make it valuable for small businesses.
Some of MailChimp’s best features include:
Drag and Drop Builder
A drag-and-drop email builder that makes it easy to create beautiful emails
Templates for A Variety of Industries
A wide range of templates so you can find the perfect look for your business
Email Automation
Automation tools that let you send emails based on customer behavior
Email tracking and analytics
Robust reporting so you can track the success of your campaigns
Here is a full list of Mail Chimp features:
MailChimp Full List of Features
- AB Testing
- API
- Activity Dashboard
- Activity Tracking
- Alerts/Notifications
- Archiving & Retention
- Audience Targeting
- Auto-Responders
- Automated Publishing
- Automated Scheduling
- Behavior Analytics
- Behavioral Targeting
- CAN-SPAM Compliance
- Campaign Analytics
- Campaign Management
- Campaign Segmentation
- Campaign Tracking
- Channel Management
- Click Tracking
- Collaboration Tools
- Contact Database
- Content Management
- Conversion Tracking
- Customer Accounts
- Customer Activity Tracking
- Customer Database
- Customer Journey Mapping
- Customer Profiles
- Customer Segmentation
- Customer Surveys
- Customizable CTAs
- Customizable Fields
- Customizable Forms
- Customizable Templates
- Dashboard
- Data Analysis Tools
- Data Import/Export
- Data Synchronization
- Design Management
- Drag & Drop
- Drip Campaigns
- Dynamic Content
- Email Campaign Management
- Email Distribution
- Email Management
- Email Marketing
- Email Templates
- Email Tracking
- Engagement Tracking
- Event-Triggered Actions
- For iPad Devices
- Form Builder
- Geolocation
- Geotargeting
- Image Library
- Interaction Tracking
- Landing Pages/Web Forms
- Lead Capture
- Lead Generation
- Lead Nurturing
- Lead Segmentation
- List Management
- Live Chat
- Location Tracking
- Mailing List Management
- Marketing Automation
- Marketing Calendar
- Mass Texting
- Mobile Access
- Mobile Optimized Emails
- Mobile Retargeting
- Mobile Survey
- Monitoring
- Multi-Account Management
- Multi-Campaign
- Multi-Channel Communication
- Multi-Channel Data Collection
- Multi-Channel Distribution
- Multi-Channel Management
- Multi-Channel Marketing
- Multiple User Accounts
- Multivariate Testing
- Offline Response Collection
- Order Management
- Performance Metrics
- Personalization
- Post Scheduling
- Publishing Options
- Question Branching
- Question Library
- Question Piping
- ROI Tracking
- Randomization
- Real Time Analytics
- Real Time Data
- Real Time Editing
- Real Time Monitoring
- Real Time Reporting
- Recommendations
- Referral Tracking
- Reporting & Statistics
- Reporting/Analytics
- Response Quotas
- Response Validation
- Responsive
- Search Marketing
- Search/Filter
- Segmentation
- Shared Inboxes
- Site Intercept Survey
- Skip Logic
- Social Advertising
- Social Marketing
- Social Media Integration
- Social Media Monitoring
- Social Media Retargeting
- Social Promotion
- Spam Blocker
- Subscription Management
- Support Audio/Images/Video
- Survey Builder
- Team Management
- Template Management
- Third Party Integrations
- To-Do List
- URL Customization
- Unsubscribe Database
- WYSIWYG Editor
- Website Integration
- Website Visitor Tracking
- Workflow Management
- eCommerce Management
Yea, that’s a whole lot of features that you can grow into.
How do I start using MailChimp for email marketing?
Getting started with MailChimp is easy!
Just sign up for a free MailChimp account, and you’ll be able to create your first campaign in minutes. Plus, there are lots of resources to help you get started, like their email marketing resources, guides, and tutorials.
Step 1: Sign up
Go to MailChimp to sign up for a free account.
🚀 GET A FREE MAIL CHIMP ACCOUNT
Step 2: Import Your Contacts/Upload Your List
If you already have an email list of subscribers and customers, you can add them to your MailChimp account right away.
MailChimp offers these suggestions before you start:
- To get started with importing your contacts, you’ll need a blank sheet in a spreadsheet program like Microsoft Excel or Google Sheets, saved or exported as a comma-separated value (CSV) file.
- Certain fields, like birthdays and dates, must be formatted in a specific way. Make sure you’re familiar with their format guidelines before importing your file.
- In your MailChimp account, you can categorize your contacts based on their email status, such as subscribed or unsubscribed. You can only import to one status at a time.
- If your import brings your total contact count above the limit of your Marketing plan tier, you’ll be subject to an additional contact charge. Be sure to note this as it’s easy to accidentally go over your plan and get charged overages. It is cheaper to upgrade your plan in most cases.
Import from another service
To save time and effort, MailChimp lets you connect six of the most commonly used integrations and will import contacts for you.
Here’s the list of MailChimp’s currently supported apps:
- Zapier
- QuickBooks Online
- Salesforce
- WooCommerce
- Squarespace Commerce
- Shopsync
To connect another app and import contacts to MailChimp, follow these steps.
- Click Audience.

- Click Audience dashboard.

- If you have more than one audience, click the Current audience drop-down and choose the one you want to work with.
- Click the Manage Audience drop-down and choose Import contacts.
- Choose Import from another service.

- Click Continue.

- Click Add on one of the available integration tiles to begin connecting your app. Previously connected integrations will have a checkmark instead of the add button.

- Click Done after you’ve connected the app.
That’s it! You’ve now connected your app and MailChimp will import contacts.
Import new contacts from a file
The file import process has two parts: First, you’ll prepare your spreadsheet of contacts outside of MailChimp and save it as a CSV file. Next, you’ll use their import tool to upload your file and add your contacts to your MailChimp audience.
Prepare for import
To prepare your file for import, follow these steps.
- In a spreadsheet program like Microsoft Excel or Google Sheets, open your blank worksheet.
- Create and label a column for Email Address. This is the only field required.

- Next to your Email Address column, create and label additional columns for First Name, Last Name, and any other information you want to import to MailChimp.

To learn how to format phone numbers, birthdays, mailing addresses, and other types of data, check out Format Guidelines for Your Import File. - Paste your contacts’ information into the relevant fields in the spreadsheet.

- Save the file in CSV format. This option can usually be accessed from the File menu in your spreadsheet program, labeled as “Export as .CSV” or “Download as .CSV”. Different spreadsheet programs may vary.
Nice job! Now that you’ve prepared your CSV file, you’re ready to import your list.
Need help with your spreadsheet file before you import into MailChimp? Check out these CSV tips from Microsoft Excel and Google Sheets. Or, download their sample CSV import file and replace the sample emails with your own data.
Import your file into MailChimp
To import your contacts to MailChimp, follow these steps.
- Click Audience.
- Click Audience dashboard.
- If you have more than one audience, click the Current audience drop-down and choose the one you want to work with.
- Click the Manage Audience drop-down and choose Import contacts.
- Choose Upload a file.

- Click Continue to Upload.
- Click Browse and choose the CSV file from your computer.

- Click Continue to Organize.

- Use the Select an audience drop-down to confirm the audience you want to import to.

- Use the Select a status drop-down to choose the status of the contacts you’re about to import.
 The available statuses for contacts are:
- Subscribed
- Unsubscribed
- Non-subscribed
- Cleaned
If you import subscribed contacts, be sure that you have permission to send them marketing.
- If your audience has groups, you can import your contacts directly into the group of your choice. Navigate to the Select groups section and check the box next to each group that applies.
 You’ll only see this option if you have groups in your audience.
 - If you want to update contacts that are already in your audience, check the box next to Update any existing contacts.

- Click Continue to Tag.

- If you want to assign tags to all of the contacts in your import, click the drop-down menu and choose or create tags as needed. You can also choose from popular tags.

- When you’re ready, click Continue To Match.

- Match the columns in your import file to the fields in your Mailchimp audience. We’ll automatically match some columns for you. For example, the column that contains email addresses will match the required Email Address field.

- Click the column header to choose a different field type for the column or to create a new field. Repeat for all unmatched columns that you want to import. Any unmatched columns will not be imported.

- Click Finalize Import to review your import settings.

- If everything looks good, click Complete Import.

That’s it! After the import is finished, they’ll send a notification to the email address associated with your username.
Step 3: Create Your First Campaign
An email campaign is a marketing message that you share through email, ads, or some other channel. In MailChimp, a regular email is a bulk email campaign sent to many contacts at once.
When you create a regular email, you’ll use their campaign builder to add recipients, choose your settings, and then design your email content.
Create an email
To create a regular email, follow these steps.
- Click the Create icon.
- Click Design Email under Regular Email

- Start by entering your campaign name and continue through the builder, where you’ll choose your settings and design your content.
Setup and design
The MailChimp email builder is designed to let you work on the different parts of your email in the order you choose, and review everything at once before you send your email.
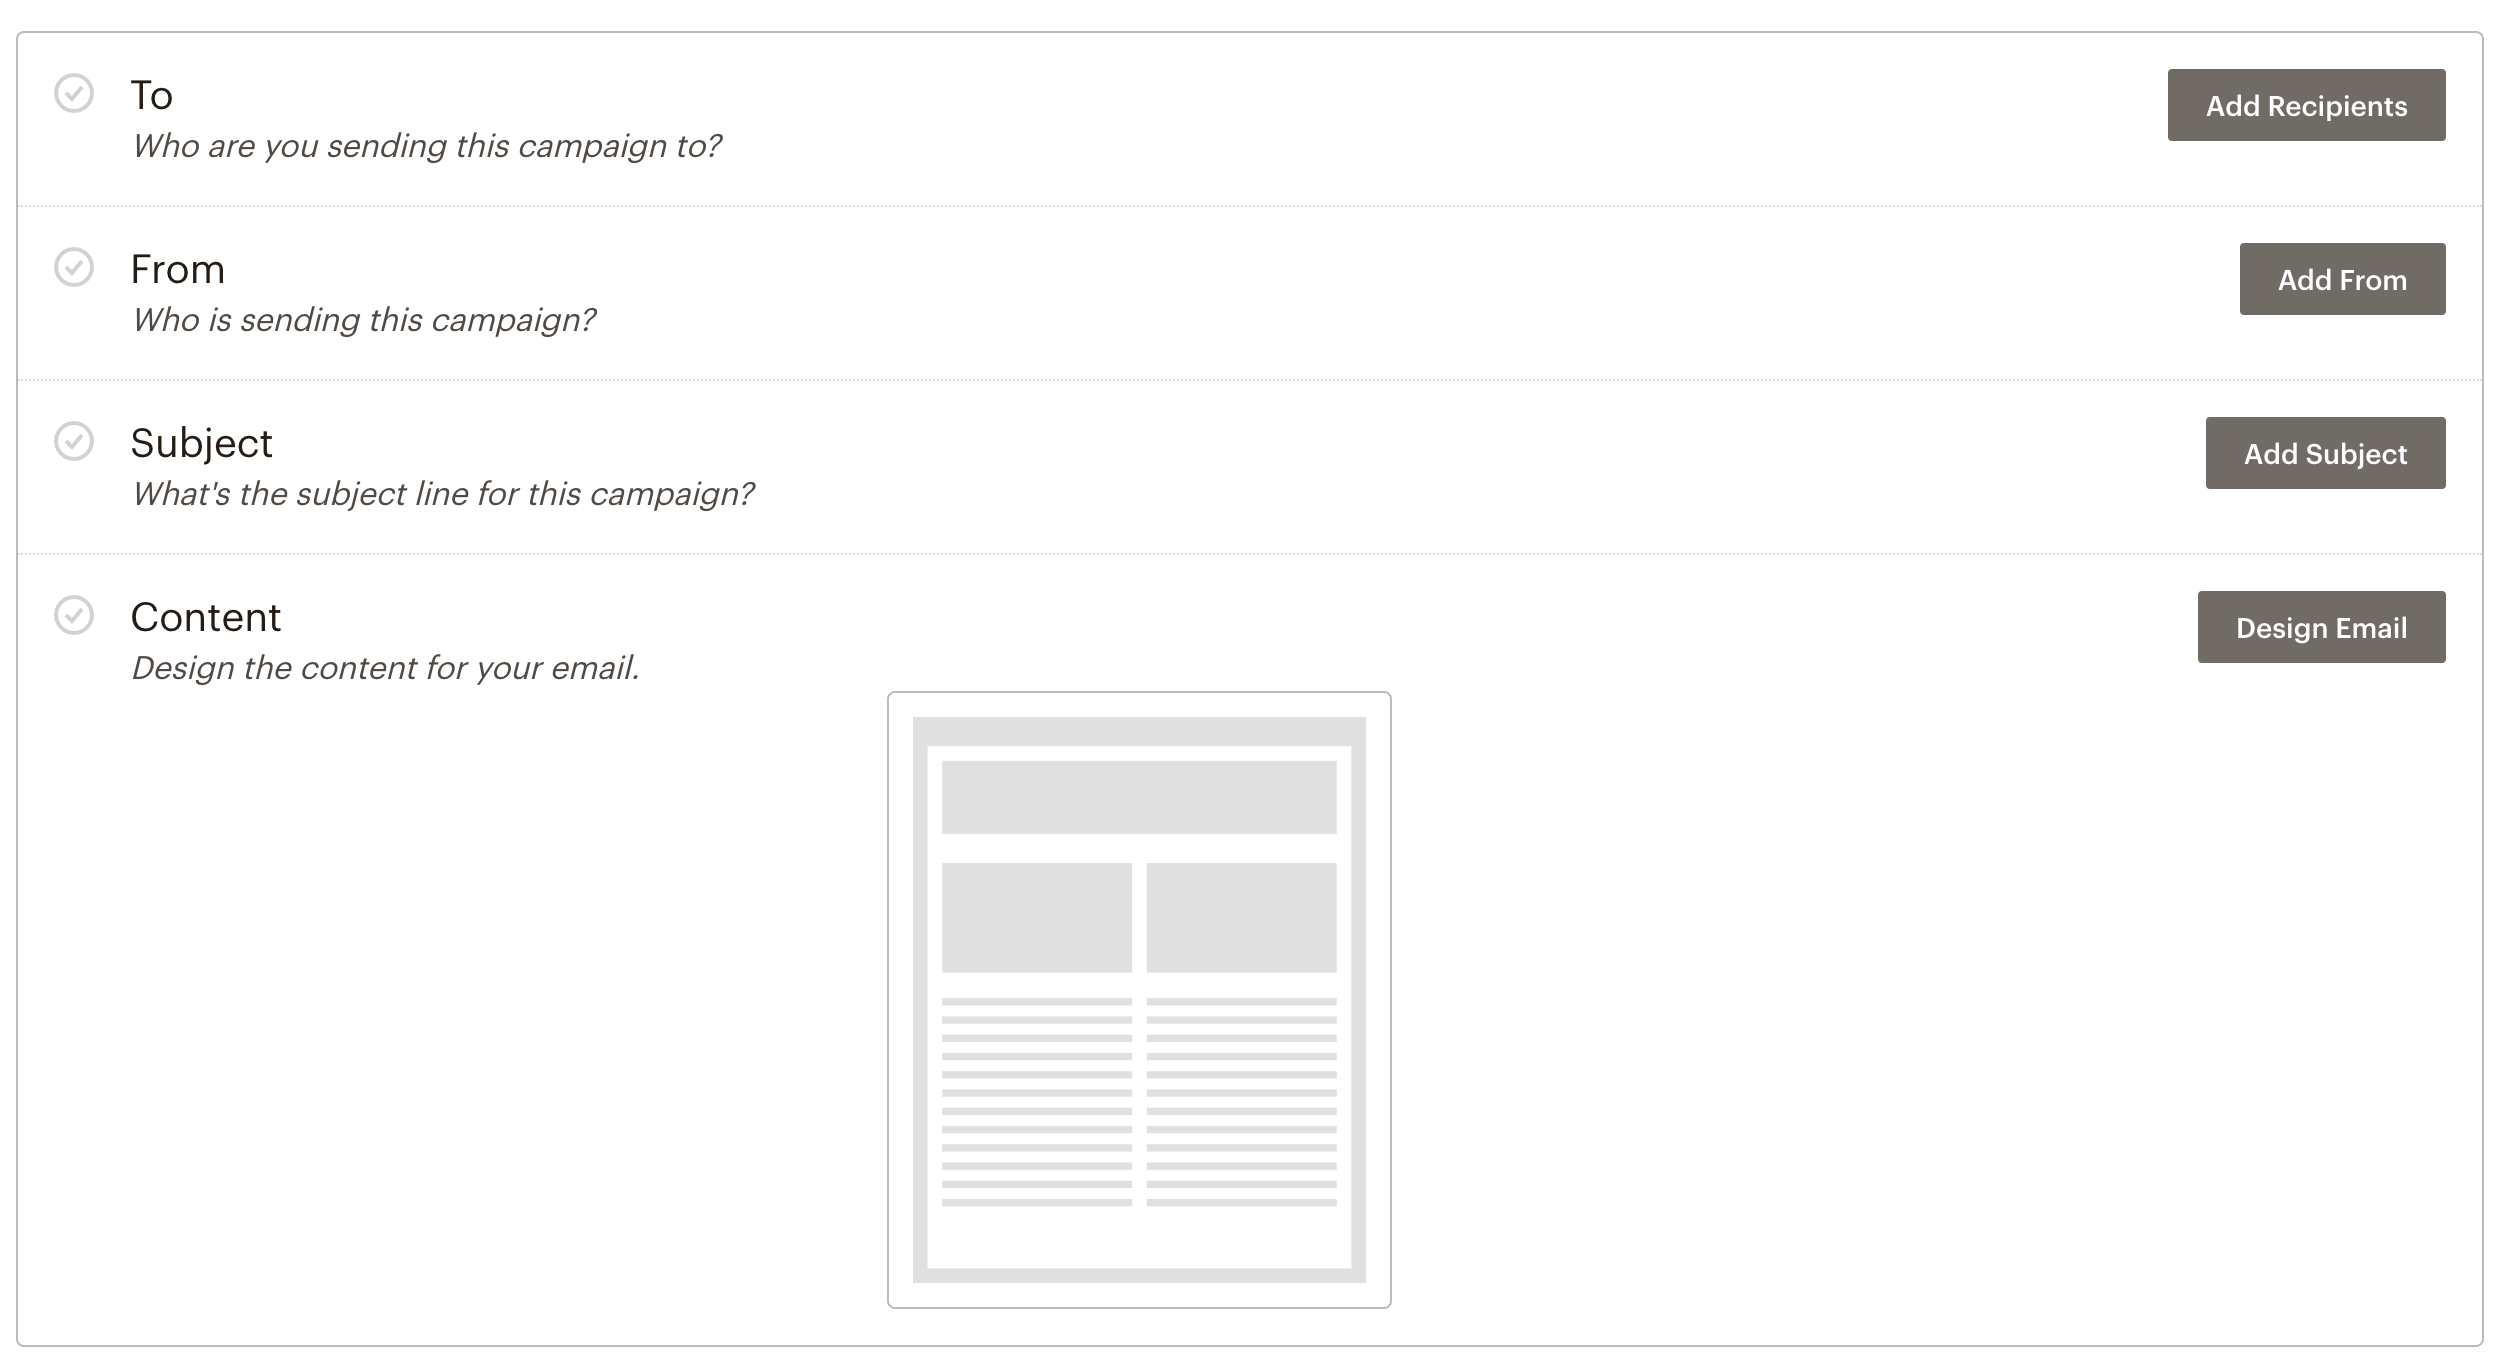
There are four main things to do before you send or schedule your email.
- Add your recipients in the To section.
- Add your from name and from email address in the From section.
- Add your subject line in the Subject section.
- Design your email in the Content section.
As each task is completed, a green checkmark will appear next to the corresponding section.

You may also want to review your tracking options and other settings.
Add recipients
To choose your recipients for the email, follow these steps.
- In the To section, click Add Recipients.

- In the Audience drop-down menu, choose the audience you want to send to.
- In the Segment or Tag drop-down menu, choose All subscribers in audience, Group or new segment, or one of the available saved or pre-built options.

- Optional: Check the Personalize the “To” field box to display the subscriber’s name instead of their email address. This is more personal and may help you avoid spam filters and can increase open rates.
 After you check the box, you’ll choose a merge tag that corresponds with the data you want to display in the “To” field. For example, if you choose |FNAME|, a recipient named Bob will see “To: Bob” instead of “To: bob@example.com.”
 - Click Save.
Add from name and from email address
To set your from name and from email address, follow these steps.
- In the From section of the email builder, click Add From.

- Enter your from name and email address. Decide if you want your from name to be your name or your business name or a combination of both like Amelia from The Potted Planter.
 You may be asked to verify the domain in your email address if this is your first time sending – you won’t have to do this again.
 - Click Save.
Add subject
To set your subject line and optional preview text, follow these steps.
- In the Subject section of the email builder, click Add Subject.

- In the Subject field, enter a subject line for your email.

- In the Preview text field, you can enter up to 150 characters that will display next to your subject line in recipients’ inboxes. This field is optional but suggested for higher open rates.

- Click Save.
Design your email
Whether you’re a beginner or email marketing expert, MailChimp gives you tools to design beautiful email campaigns with ease. You can choose to work with the new inline email builder or use their drag-and-drop classic email builder.
To design your email, navigate to the Content section and click Design Email.

Then, choose whether you want to work with the Classic Builder or New Builder. (I like the Classic Builder – I think it’s easier and more straight-forward at this time).

Here’s an overview of each option.
- Classic Builder Use the classic builder to work with the many email template designs, e-commerce features, and Creative Assistant. Drag and drop content blocks as needed, or custom code from scratch. To learn how to use this builder, check out Design an Email with the Classic Builder.
- New Builder Use the new builder to add and edit content directly to your layout in a refined interface. To learn how to use this builder, check out Design an Email with the New Builder.
After you choose the same email builder twice in a row, it will become the default builder. You can manually set or change your default email builder in your Account Details.
Settings and tracking
When you create a regular email, we enable certain tracking options by default. This includes open and click tracking, as well as e-commerce tracking if you have a connected online store.
To edit your tracking options, follow these steps.
- Scroll to the Settings & Tracking section and click Edit.

- Check the boxes next to the tracking options you want to enable.
- Click Save.
Send your campaign
After you’ve completed the To, From, Subject, and Content sections of the email builder, you should see a green checkmark next to each. That means your regular email is ready to send.

If you have a MailChimp Standard plan or higher, you can also schedule your email. To change your plan type, visit the plans page in your account.
If you’re ready to send the email to your subscriber list, click Send. Then, in the Review Your Campaign section, click Send Now to confirm your send.
Your email will be on its way!
MailChimp Makes Email Marketing Easy!
As you can see, MailChimp is a solid option for email marketing for small business owners looking to use email to stay in touch with their customers, grow relationships with their subscribers and get more sales.
If you need any help getting started, leave a comment and I’d be happy to help you out.
If you want to know some alternatives to MailChimp check out The Best Email Marketing Platforms.
About Digital Marketing Expert Torie Mathis
 Torie Mathis helps entrepreneurs, like you, use digital marketing to grow your business without wasting time, money, or your sanity. She is a best-selling author, Army veteran, speaker + trainer, and your digital marketing coach. You don't need crazy tech skills, buckets of cash, or dedicated staff to market your business. In fact, you don't even need a lot of time. What you need is to be SMART.
Torie hosts SMART AF, a show for non-techy entrepreneurs looking to grow their business, with her husband Sean and is the creator of SMART AF Magazine. Learn from Torie at the Smart Arsenal and on her channel.

What do you think? Let's talk! Leave a comment.

 I help entrepreneurs learn digital marketing.
And I make it easy!
You don’t need crazy tech skills, buckets of cash, or dedicated staff to market your business. You don’t even need a lot of time.
What you need is to be SMART.
Is YOUR marketing SMART?


Hi! I'm Torie!
 I help entrepreneurs (like you) use digital marketing to get more clients + make more money. And I make it easy!
You don’t need crazy tech skills, buckets of cash, or dedicated staff to market your business. You don’t even need a lot of time.
What you need is to be SMART.
Smart Marketing For
Get Smart AF
DELIVERED TO YOUR INBOX
from your Digital Marketing Coach Torie Mathis!
Let's get SMART!
Let's Connect!

*Posts may contain affiliate links. If you use these links to purchase, I may earn a commission at no additional cost to you.


0 Comments